
Azure table storage is a NoSql table and it’s great for storing tons of data, but it’s also good for just a few records. You can connect to the table storage with Excel, Access and – by sure – with PowerBI. It’s easy to programmatically write data to the table storage and with the Excel/PowerBI connection, it’s great to use it for data analysis or for dynamic Excel files.
Additionally, the Azure table storage is very cheap! 1 GB storage + 100.000 transactions = 0.06€ per month. That’s nearly nothing, because it is designed to work with tons of data. Troy Hunt used it with 154 million records – and it worked like a charm! https://www.troyhunt.com/working-with-154-million-records-on/.
In this blog post, I will create a table storage and put only a few records in it. After that I’ll connect Excel to the table storage. So the steps to do are:
- Create a storage account
- Create a table in the storage account
- Fill it with data
- Check if data is there (storage explorer)
- Connect with Excel
Create storage account
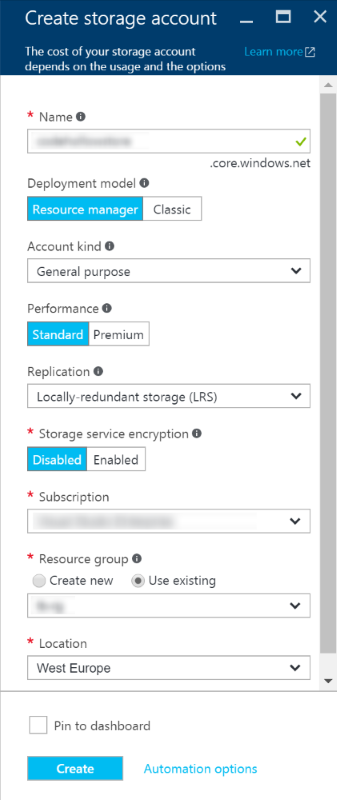
The first step is to create a storage account in the Azure Portal.

I decided to use the cheapest version (locally-redundant storage) with standard performance and without encryption, because I’ll only use it for small data which I will fill programmatically and show in Excel.
The storage account is created. The next step is to create a table in the table storage – so let’s check it in the Azure portal:
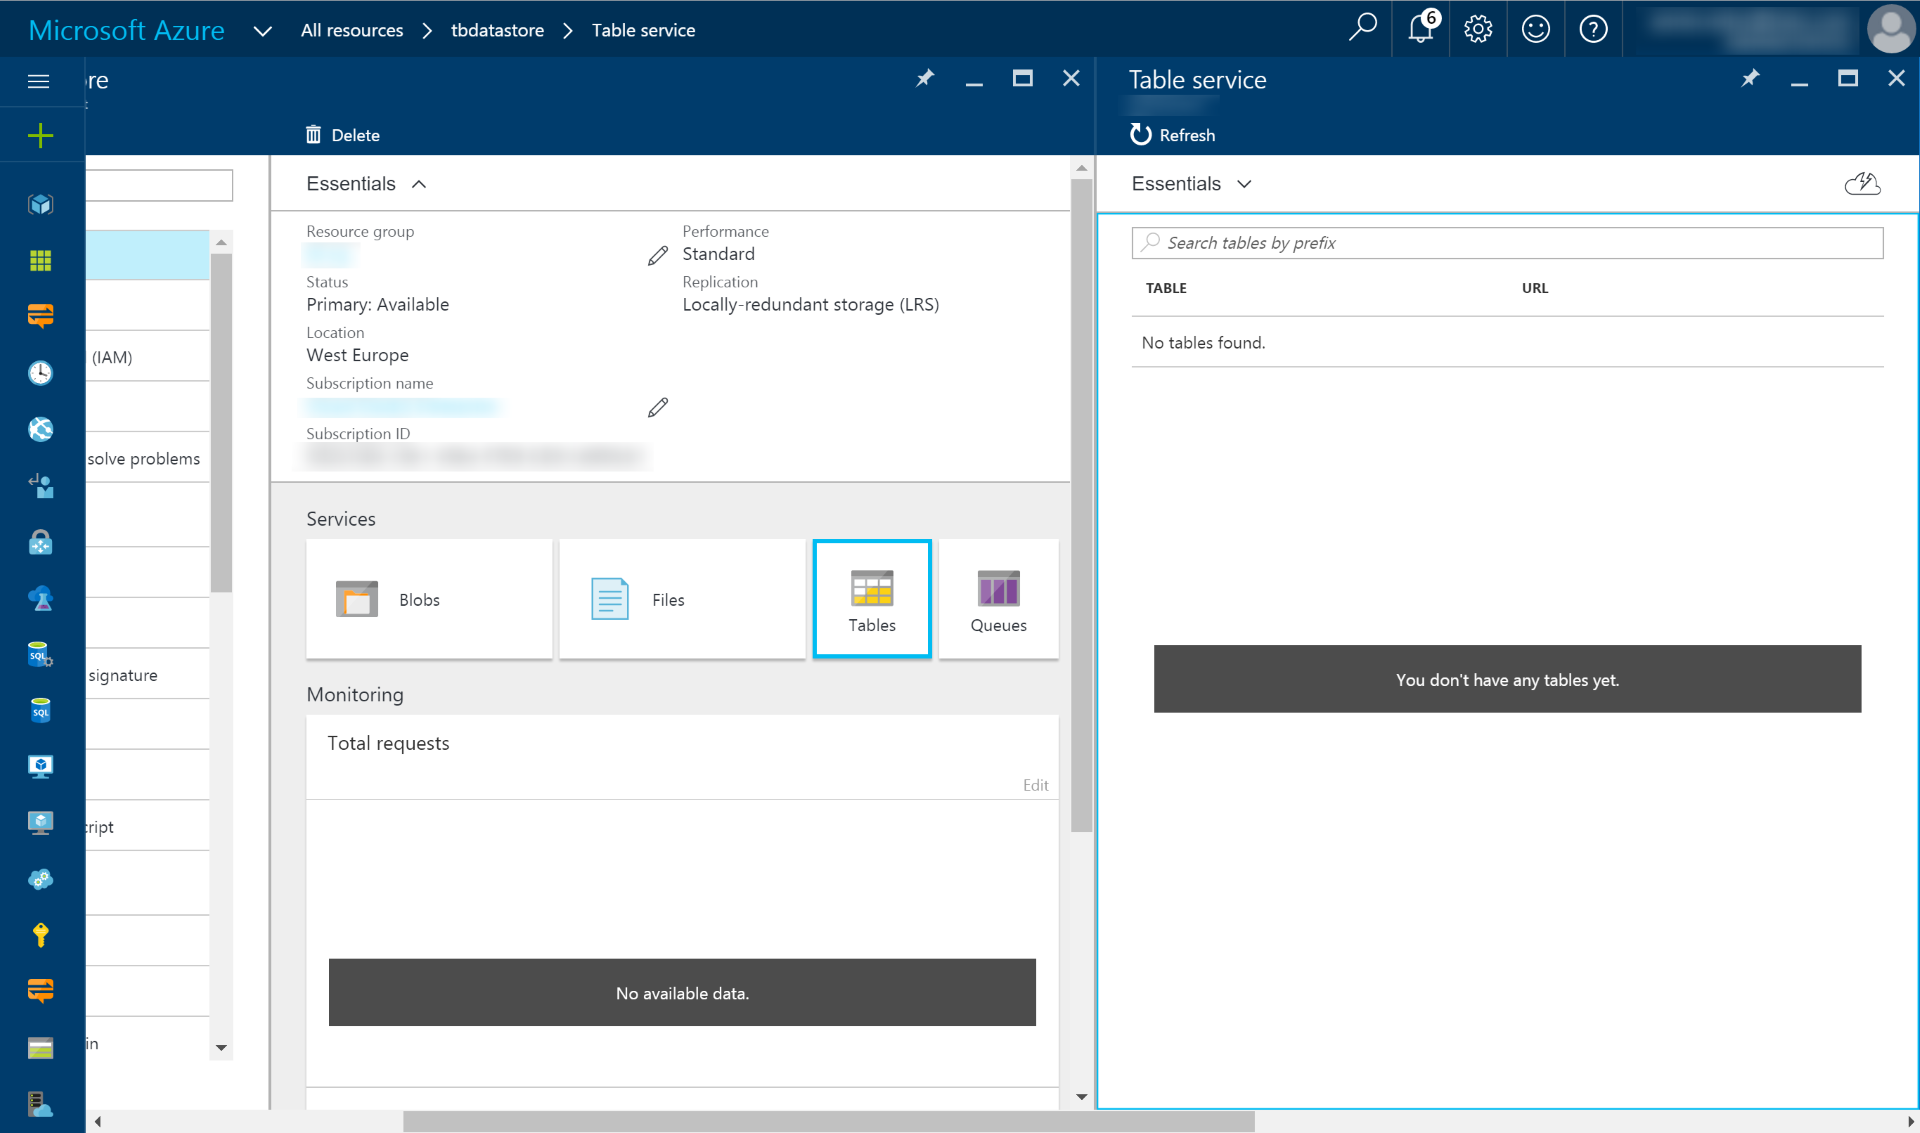
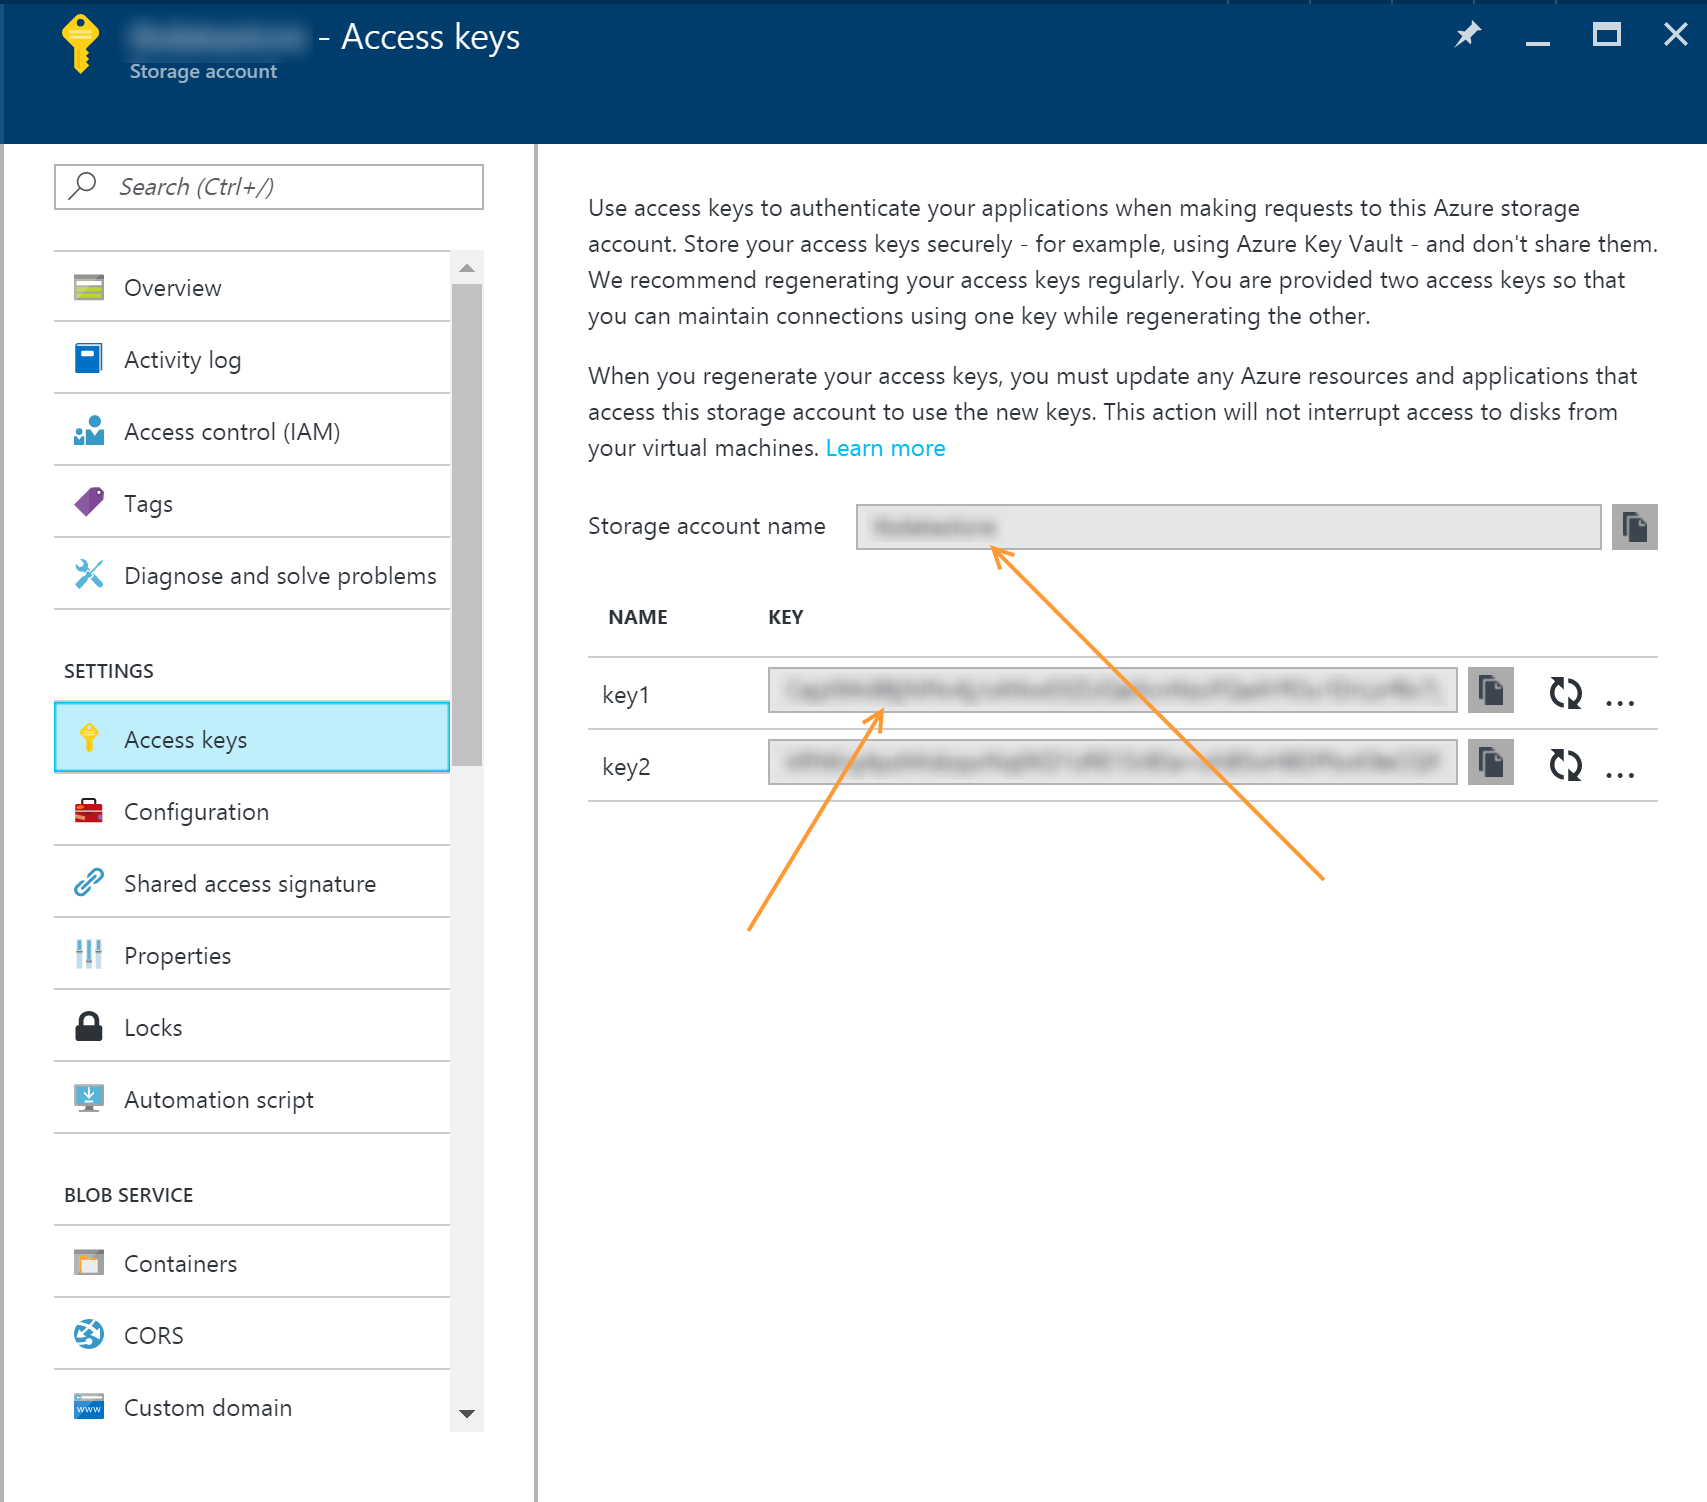
We can see that there is no “create table” button available. So it seems we have to do it another way. I’ll use, as usual, my beloved Powershell. But before jumping into the script, we should copy the storage access key which can be found in the Settings – “Access Keys”:
Create a table using Powershell
There are already some basic commandlets available to create a table in the Azure Storage. These commandlets are part of the Azure.Storage module. If it isn’t already loaded, execute the following lines:
Import-Module AzureRM.Profile
Import-Module Azure.Storage
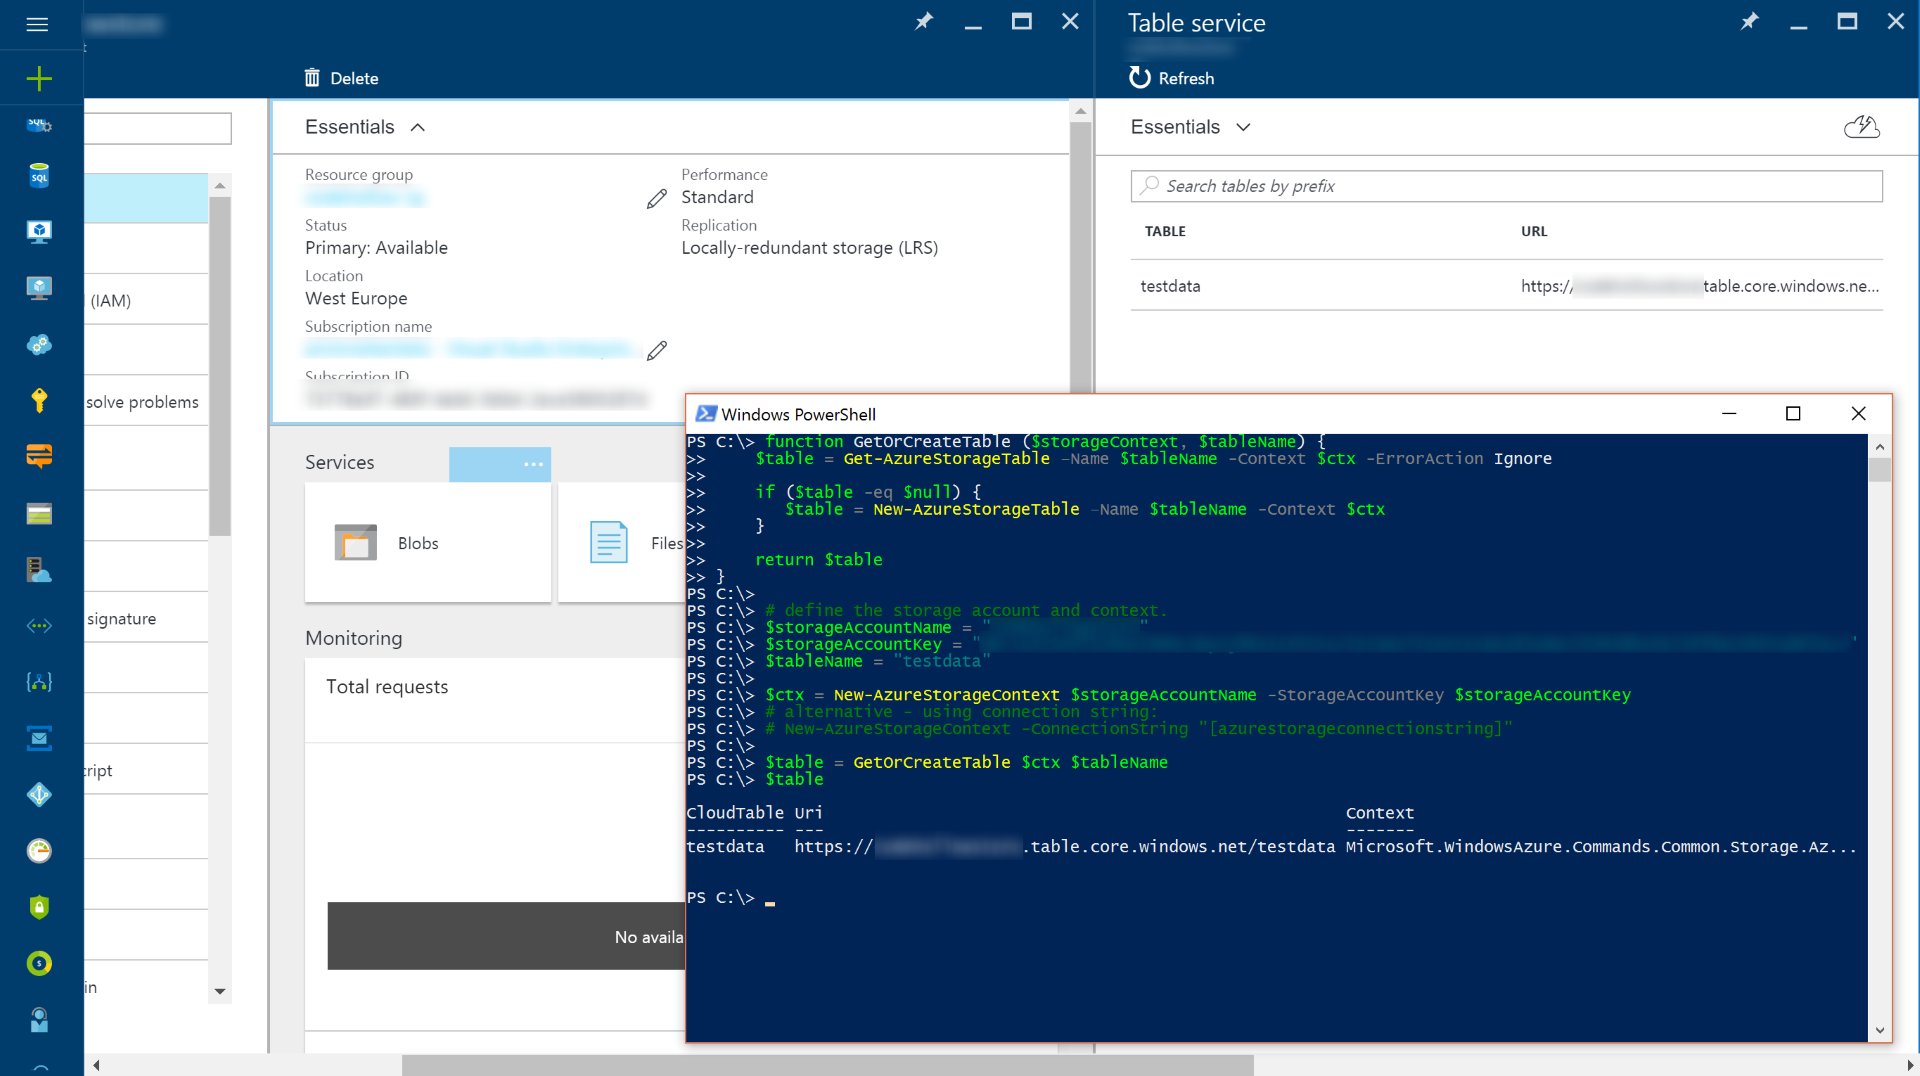
The commandlet to create a storage table is New-AzureStorageTable. The whole script, including the connection and a check if the table already exists:
function GetOrCreateTable ($storageContext, $tableName) {
    $table = Get-AzureStorageTable –Name $tableName -Context $ctx -ErrorAction Ignore

    if ($table -eq $null) {
       $table = New-AzureStorageTable –Name $tableName -Context $ctx
    }

    return $table
}

# define the storage account and context.
$storageAccountName = "[STORAGE ACCOUNT NAME]"
$storageAccountKey = "[STORAGE ACCOUNT KEY]"
$tableName = "testdata"

$ctx = New-AzureStorageContext $storageAccountName -StorageAccountKey $storageAccountKey
# alternative - using connection string:
# New-AzureStorageContext -ConnectionString "[azurestorageconnectionstring]"

$table = GetOrCreateTable $ctx $tableName
$table
Et voila, the table is there:
Fill the Azure Table
The first thing to mention before filling the data is, that the Table Storage has 2 keys: PartitionKey and RowKey. These keys together uniquely define a record. Records with the same PartitionKey are stored at the same partition server, so if we are working with a huge amount of data, then we should really think about our identifiers. As I’m working only with a few values, all my records will have the same PartitionKey.
Adding an entity via Powershell can basically be done via:
$entity = New-Object -TypeName Microsoft.WindowsAzure.Storage.Table.DynamicTableEntity -ArgumentList "MyPartitionKey, "MyPartitionValue"
$entity.Properties.Add("MyCustomColumn", "MyCustomValue");
$result = $table.CloudTable.Execute([Microsoft.WindowsAzure.Storage.Table.TableOperation]::Insert($entity))
Let’s put that into a function:
# adds a new row to an azure table
function Add-Entity($table, $partitionKey, $rowKey, $values) {
  $entity = New-Object -TypeName Microsoft.WindowsAzure.Storage.Table.DynamicTableEntity $partitionKey, $rowKey

  foreach($value in $values.GetEnumerator()) {
    $entity.Properties.Add($value.Key, $value.Value);
  }

  $result = $table.CloudTable.Execute([Microsoft.WindowsAzure.Storage.Table.TableOperation]::Insert($entity))
}

# usage sample:
#$values = @{"MyKey" = "MyValue"; "MySecondKey" = "MySecondValue"; "CurrentDate" = (get-date)}
#Add-Entity $table "MyPartitionKey" "MyRowKey" $values
This script throws an error if there is already an entry with the same PartitionKey and RowKey.
I want to fill my Azure Table with the data from my blog. To do that, I’ll use the script from yesterdays post (Read RSS feeds via Powershell) to read my RSS feed. I also extended the function Add-Entity so that it checks if the entry was already added:
# adds a new row to an azure table but checks at first if entry already exists
function Add-Entity($table, $partitionKey, $rowKey, $values) {
  # check if entry already exists
  $existing = $table.CloudTable.Execute([Microsoft.WindowsAzure.Storage.Table.TableOperation]::Retrieve($partitionKey, $rowKey))
  if($existing.HttpStatusCode -eq "200") { return; }

  $entity = New-Object -TypeName Microsoft.WindowsAzure.Storage.Table.DynamicTableEntity $partitionKey, $rowKey

  foreach($value in $values.GetEnumerator()) {
    $entity.Properties.Add($value.Key, $value.Value);
  }

  $result = $table.CloudTable.Execute([Microsoft.WindowsAzure.Storage.Table.TableOperation]::Insert($entity))
}

$i = 1
while($true) {
    try { $chfeed = [xml](Invoke-WebRequest "https://arminreiter.com/feed/?paged=$i") }
    catch { break; }

    foreach($entry in $chfeed.rss.channel.item) {
        $values = @{ "URL" = $entry.link;
            "Title" = $entry.title;
            "PubDate" = [DateTime]::Parse($entry.pubDate) }
        $rowKey = $entry.'post-id'.InnerText.PadLeft(5, '0') #add 0 at beginning for sorting
        Add-Entity $table "CodeHollow" $rowKey $values
        $entry.title
    }

    $i++
}
The script executed without an error, but is the data really stored?
Read Azure Table Storage using Storage Explorer
There is a really great, useful and free tool available – the storage explorer (Download http://storageexplorer.com/). It allows us to browse and modify the stuff in our storage account.
So let’s check if the data is there, before we connect Excel:
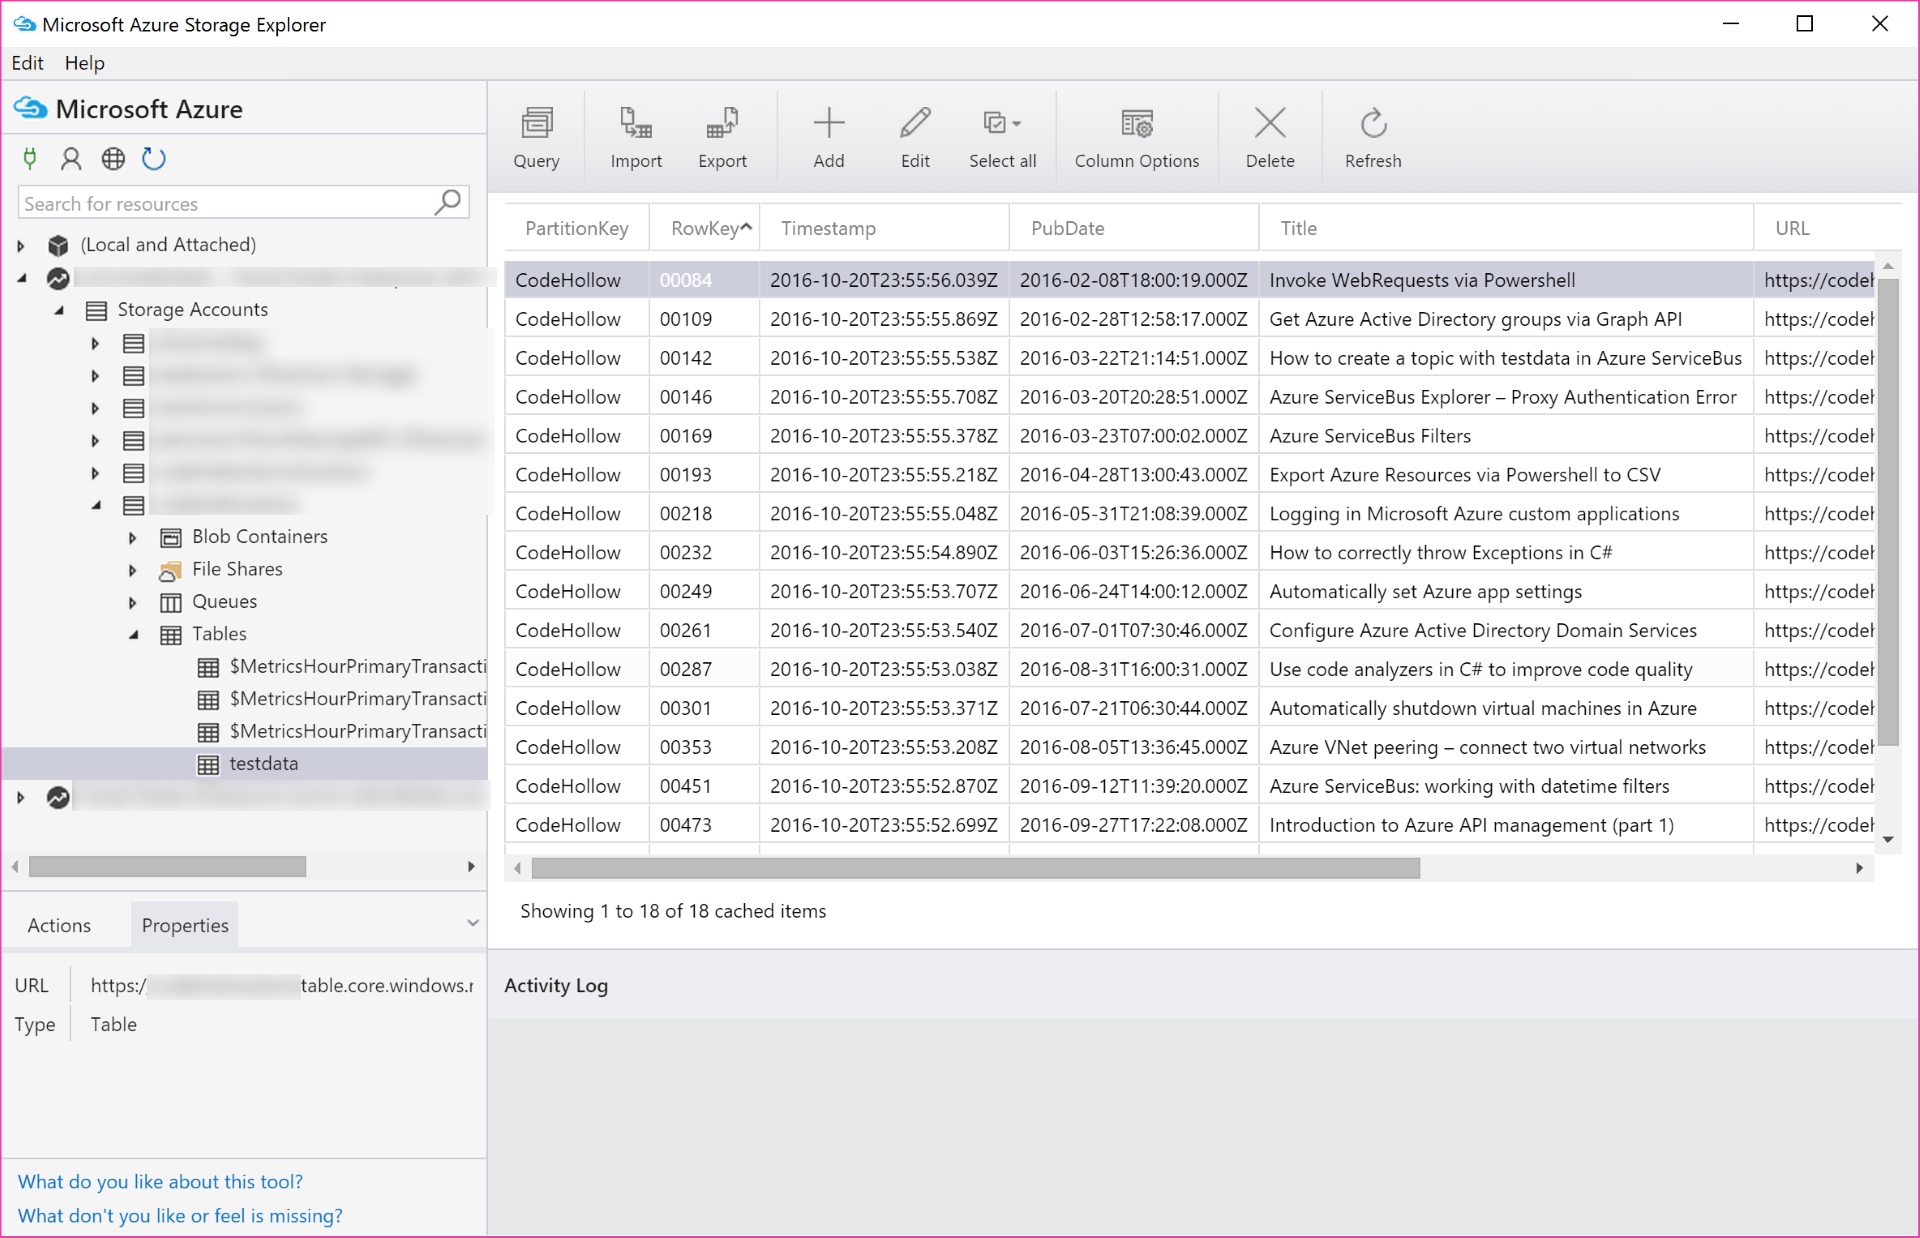
Looks good, so let’s continue…
Read Azure Table Storage using Excel
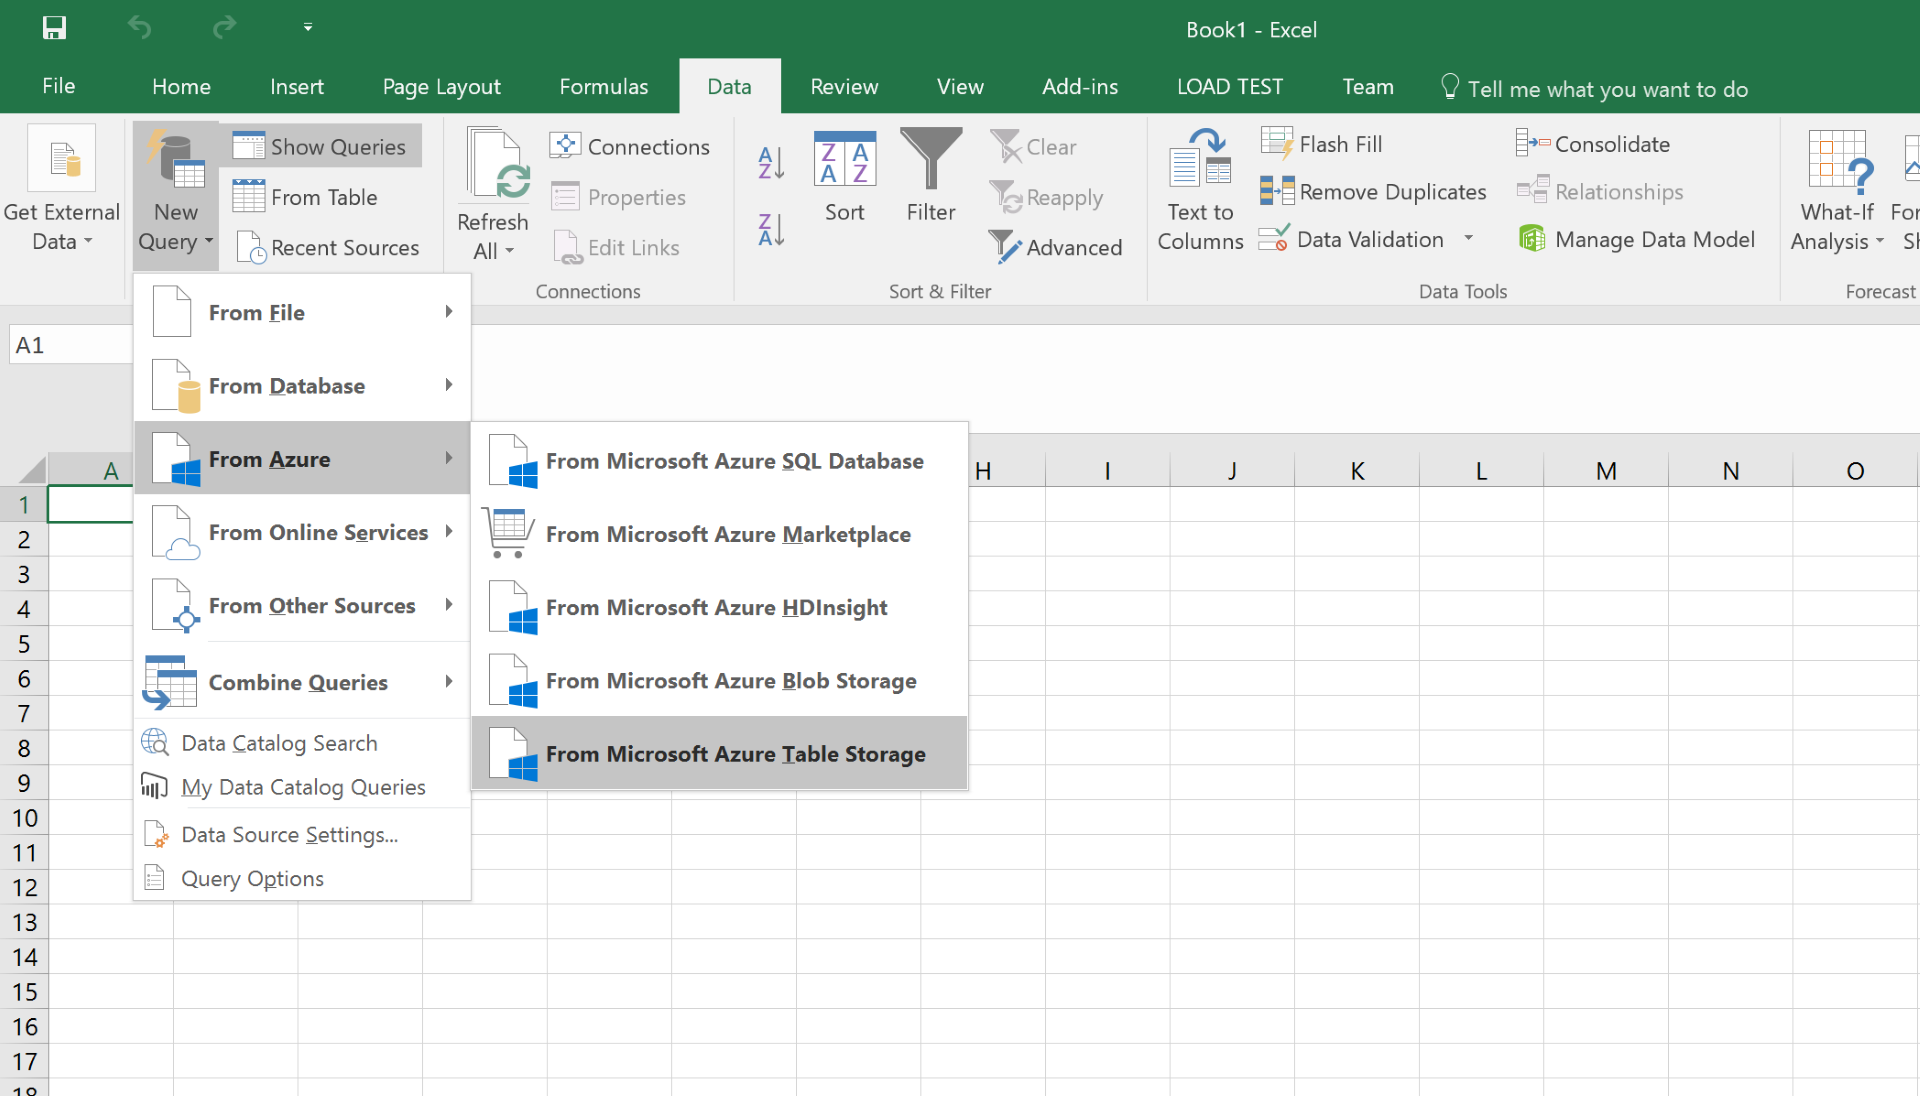
Open Excel, navigate to the Data Ribbon and add a new query:

Next step is to enter the storage account name and the Account Key (one of the Access Keys). You should now be able to select the table and load the data. Click on “edit” as we also want to show our “custom” (content) columns:
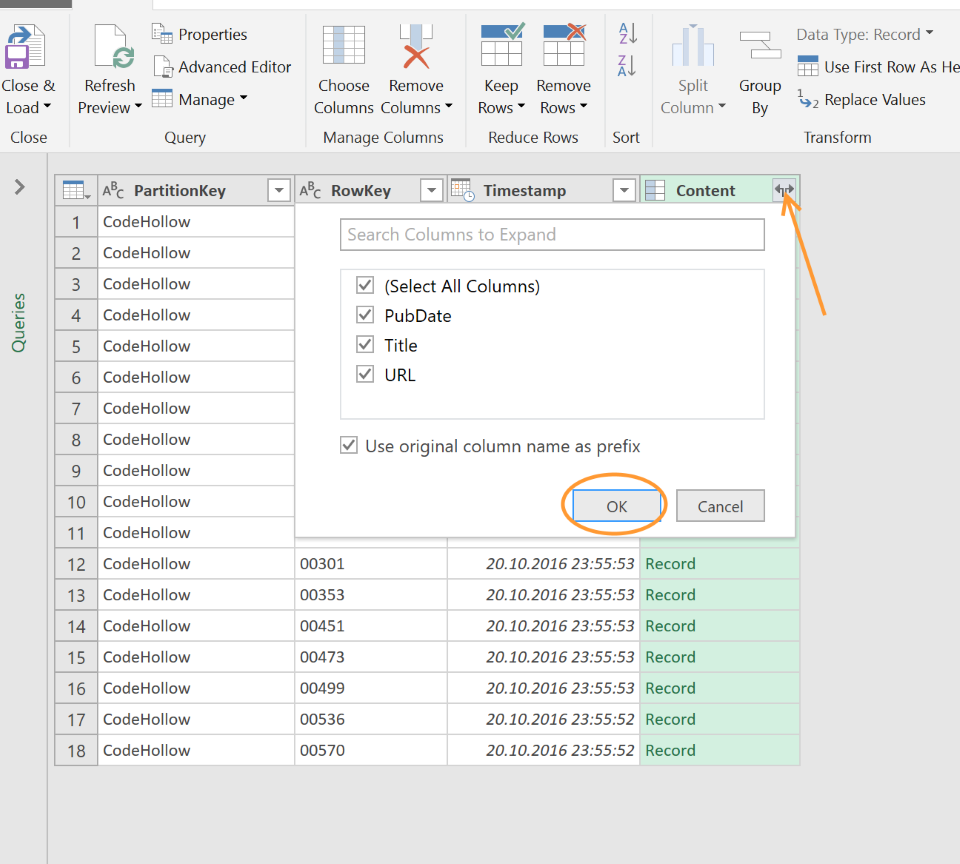
Press the small button at the “content” column and ok:
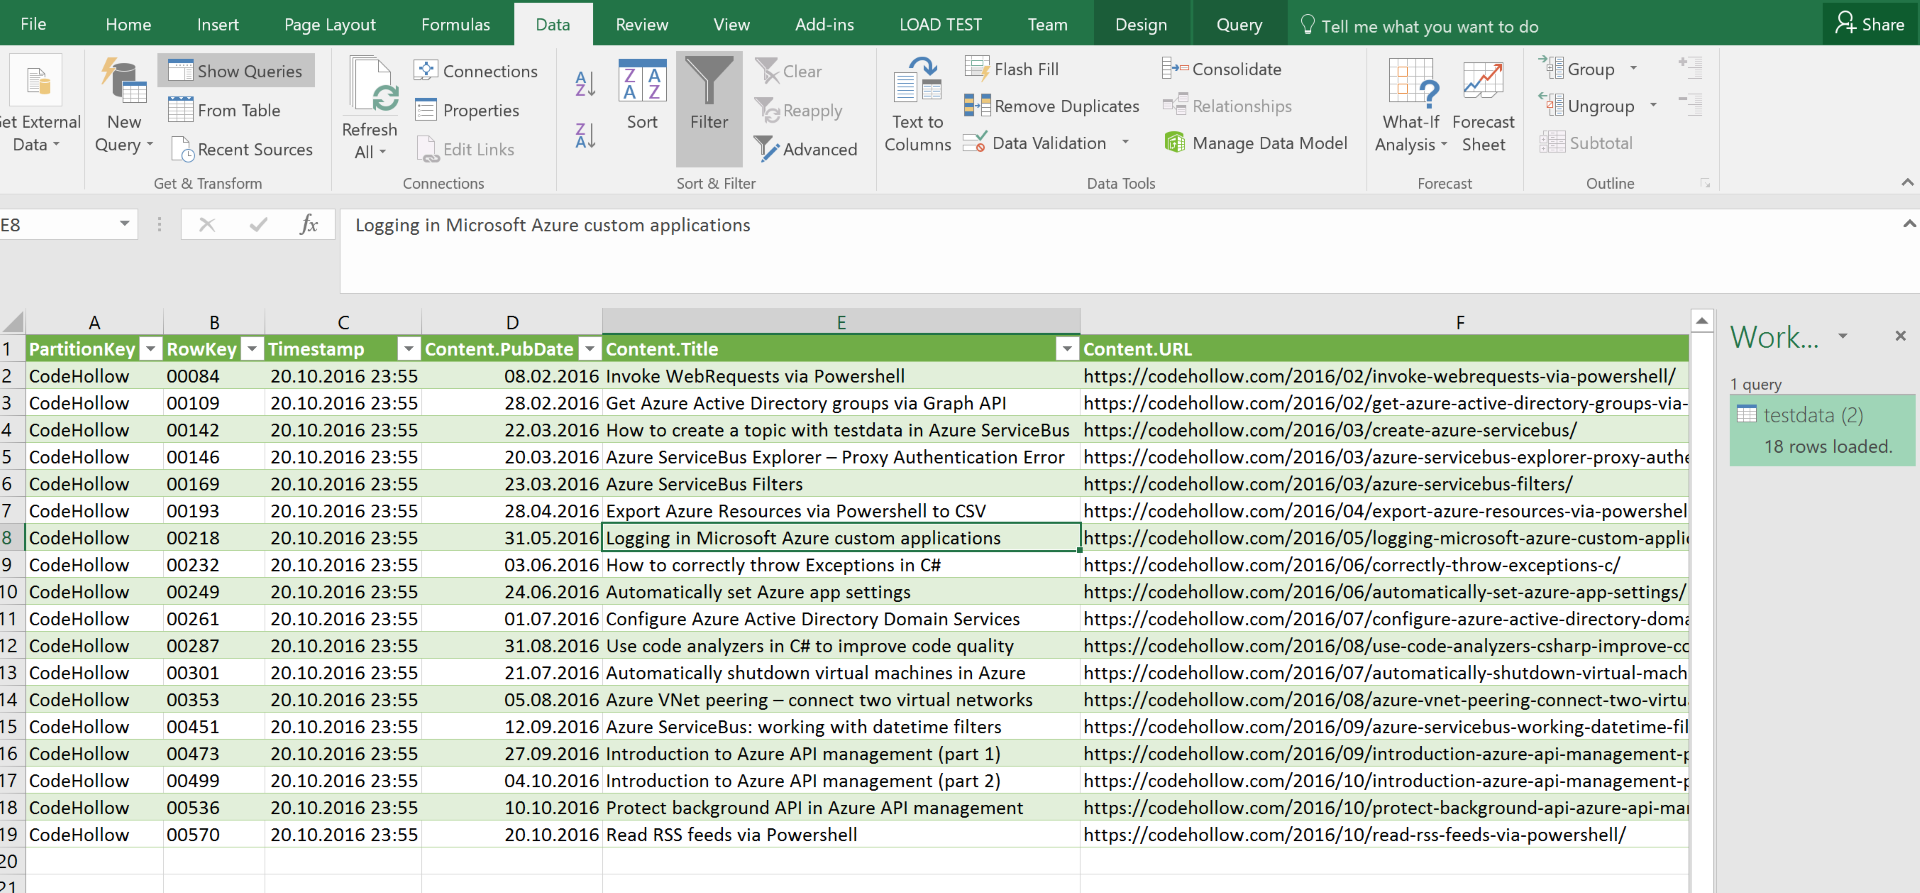
So everythings configured, press close & load, modify some columns (format as datetime) and the result is there:
From now on, everytime I open this Excel, I can easily refresh the data by clicking “Refresh” in the Data Ribbon.
The data is currently added manually each time I execute the script. So the next step is to run the script automatically so that the Azure Table gets filled periodically. There are multiple ways to achieve that – two of them are Azure Functions and Azure WebJobs. I’ll write blog posts about both of them.
Additional information
- Azure Table Storage Design Guide: https://azure.microsoft.com/en-us/documentation/articles/storage-table-design-guide/
- Using Azure PowerShell with Azure Storage: https://azure.microsoft.com/en-us/documentation/articles/storage-powershell-guide-full/
- Working with 154 million records on Azure Table Storage – the story of “Have I been pwned?”: https://www.troyhunt.com/working-with-154-million-records-on/
- Read RSS feed via Powershell: https://arminreiter.com/2016/10/read-rss-feeds-via-powershell/


Comments are closed