
Who isn’t tired of certificate errors at internal devices that serve a WebUI but don’t have a trusted certificate? Let’s encrypt is probably not the best alternative as there is no public access to the server (it is still possible, but some configuration and “workarounds” are needed).
In this blog post, we’ll create our own simple Certificate Authority, which we’ll use to sign certificates we generate for our internal servers. We will also make sure that those are trusted certificates in our network. This post starts with the basics, so if you are familiar with certificates and CAs, how they work, the difference between a public key and a certificate, and why a certificate signing request is needed, skip the next section. If you are not that enlightened – let’s start with some theories:
How do CA’s and certificates, basically, work?
Let’s assume there is a server running a simple website. The traffic to the webserver should be encrypted (use https). This encryption is done via symmetric encryption, which means that there is one key to encrypt and decrypt the traffic. This key is generated when the connection is established and is exchanged between the client and server using asymmetric encryption (so there is a public/private key pair). Search for “SSL protocol” or “SSL handshake” for details. The basic idea is:
- Client receives the public key of the server (public key is included in the certificate)
- Client generates a symmetric key
- Client encrypts the symmetric key with the public key of the server
- Client sends the encrypted symmetric key to the server
- Server decrypts the encrypted symmetric key (at this stage, client and server have the same key, so key exchange is done)
- Client and server use the symmetric key to encrypt their communication
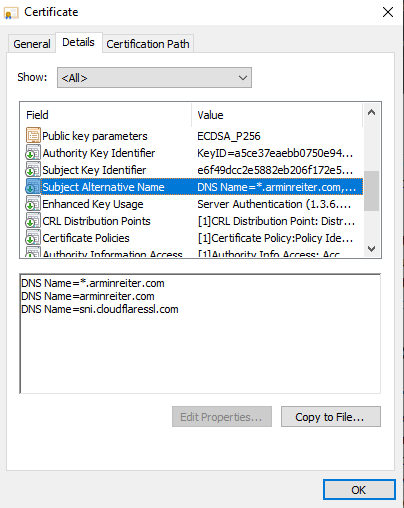
In step 1., the client receives a certificate containing the server’s public key and other information like the issuer, how long it is valid, which algorithms are used, what the certificate is about, etc. You can open a website and check the certificate details to see what it contains:
Such certificates, as well as the public/private key pair, can be generated by everyone. You can generate a certificate for the domain example.com, even if you don’t own it. That’s why it’s important to know if you can trust a certificate or not. This trust is established through “Trusted Root Certificate Authorities”. Suppose I want to get a trusted certificate for arminreiter.com. In that case, I can generate a certificate and send a certificate signing request (CSR) for this certificate to a trusted certificate authority. They will check if I am the owner of arminreiter.com and will sign my certificate. Once I deploy the signed certificate, the website visitors (browser) know that it can be trusted because it is signed by a certificate authority they trust (the signature is validated). If it is not signed, users will get a warning (it could also be that a man-in-the-middle issued its own certificate to decrypt all the traffic – so be careful if you get this warning).
This works great for public websites, mainly because of https://letsencrypt.org/. However, it’s not that easy for internal servers as let’s encrypt can’t check the internal servers. (It is possible, but it requires some work).
For internal servers, one option is to create an own certificate authority (CA), configure the internal clients to trust this CA, and issue certificates that their own CA signs. The CA has its own key pair to sign the certificate requests.
Step-by-Step
Based on the information above, we know that we have to:
- Create a private key for our own CA
- Create a certificate for the CA
- Add this certificate to the “Trusted Root Certificate Authorities” store of the clients so that it becomes trusted
- Create a certificate for our webserver
- Sign this certificate with our CA (which is trusted and therefore, also this new certificate becomes trusted)
- Deploy the certificate
Using OpenSSL to create our CA
Step 1: Create a private key for the CA
Note: we will encrypt the key with AES because if anyone gets access to the key this person can create signed, trusted certificates. Encrypting the key adds some protection (use a 20+ password).
CANAME=MyOrg-RootCA

# optional
mkdir $CANAME
cd $CANAME

# generate aes encrypted private key
openssl genrsa -aes256 -out $CANAME.key 4096
Step 2: Create Certificate of the CA
# create certificate, 1826 days = 5 years
# the following will ask for common name, country, ...
openssl req -x509 -new -nodes -key $CANAME.key -sha256 -days 1826 -out $CANAME.crt

# ... or you provide common name, country etc. via:
openssl req -x509 -new -nodes -key $CANAME.key -sha256 -days 1826 -out $CANAME.crt -subj '/CN=MyOrg Root CA/C=AT/ST=Vienna/L=Vienna/O=MyOrg'
Step 3: Add the CA certificate to the trusted root certificates
For Windows: Open the .crt file and install it for all users to “Trusted Root Certificate Authorities” (verify it by running certmgr.msc)
if you use Intune: Go to Devices > Configuration Profiles > Create profile > Windows 10 and later, Templates, Trusted certificate > upload the .crt file
For Linux (Ubuntu):
sudo apt install -y ca-certificates
sudo cp $CANAME.crt /usr/local/share/ca-certificates
sudo update-ca-certificates
Linux (Fedora/CentOS):
sudo cp $CANAME.crt /etc/pki/ca-trust/source/anchors/$CANAME.crt
sudo update-ca-trust
is by sure also possible for Android, iOS, macOS, … => internet will help 😉
Step 4: Create a certificate for the webserver
MYCERT=myserver
openssl req -new -nodes -out $MYCERT.csr -newkey rsa:4096 -keyout $MYCERT.key -subj '/CN=My Firewall/C=AT/ST=Vienna/L=Vienna/O=MyOrg'

# create a v3 ext file for SAN properties
cat > $MYCERT.v3.ext << EOF
authorityKeyIdentifier=keyid,issuer
basicConstraints=CA:FALSE
keyUsage = digitalSignature, nonRepudiation, keyEncipherment, dataEncipherment
subjectAltName = @alt_names

[alt_names]
DNS.1 = myserver.local
DNS.2 = myserver1.local
IP.1 = 192.168.1.1
IP.2 = 192.168.2.1
EOF
Note: the v3.ext file contains the properties of the v3 extension of certificates. This includes especially the SAN (subject alternative names) which contains the information about DNS or IP, which the browser needs to trust the certificate (you somehow need to make sure, that mysite.local uses the certificate that was issued for mysite.local)
Step 5: Sign the certificate
openssl x509 -req -in $MYCERT.csr -CA $CANAME.crt -CAkey $CANAME.key -CAcreateserial -out $MYCERT.crt -days 730 -sha256 -extfile $MYCERT.v3.ext
Step 6: Deploy the certificate
no explanation here, as it depends on the server.
Source/Command Recap
All commands collected in one code block:
CANAME=MyOrg-RootCA

# optional, create a directory
mkdir $CANAME
cd $CANAME

# generate aes encrypted private key
openssl genrsa -aes256 -out $CANAME.key 4096

# create certificate, 1826 days = 5 years
openssl req -x509 -new -nodes -key $CANAME.key -sha256 -days 1826 -out $CANAME.crt -subj '/CN=My Root CA/C=AT/ST=Vienna/L=Vienna/O=MyOrganisation'

# create certificate for service
MYCERT=myserver.local
openssl req -new -nodes -out $MYCERT.csr -newkey rsa:4096 -keyout $MYCERT.key -subj '/CN=My Firewall/C=AT/ST=Vienna/L=Vienna/O=MyOrganisation'

# create a v3 ext file for SAN properties
cat > $MYCERT.v3.ext << EOF
authorityKeyIdentifier=keyid,issuer
basicConstraints=CA:FALSE
keyUsage = digitalSignature, nonRepudiation, keyEncipherment, dataEncipherment
subjectAltName = @alt_names

[alt_names]
DNS.1 = myserver.local
DNS.2 = myserver1.local
IP.1 = 192.168.1.1
IP.2 = 192.168.2.1
EOF

openssl x509 -req -in $MYCERT.csr -CA $CANAME.crt -CAkey $CANAME.key -CAcreateserial -out $MYCERT.crt -days 730 -sha256 -extfile $MYCERT.v3.ext
Is this a “full” certificate authority?
No, it is not. A “real” Root CA usually consists of a Root CA, which signs the certificates of Intermediate CAs, which then sign the certificates of websites (there could also be multiple Intermediate CAs => certificate chain). This increases the security a lot because the certificate of the Root CA is only needed in very special cases (new Intermediate CA added or revoked).
The CA we created is only a public/private key pair, so it also does not maintain and publish a Certificate Revocation List (CRL), usually done by CAs. A CRL lists all revoked certificates (e.g., because the private key got leaked/compromised). If a client receives a certificate, it will check if it is still valid by checking the CRL.
Besides the CRL, they should implement the Online Certificate Status Protocol (OCSP), an alternative to CRLs. It also allows the client to check if a certificate is still valid or revoked, but it has advantages over CRLs.
Some final comments…
There are already many posts about this topic (see Further Information section), but some of them use outdated algorithms or do not contain exactly what I need.
Regarding the algorithms/usage:
- The private key of the Root CA should always be encrypted with a password. As stated above – if someone gets access to this key, this person is able to sign all certificates so that they become trusted.
- Triple-DES (3DES) is officially being retired (by NIST) and is therefore considered as unsecure. AES was created to replace 3DES (see e.g.: https://www.cryptomathic.com/news-events/blog/3des-is-officially-being-retired) and is still considered secure.
- RSA vs. Elliptic Curves: Elliptic Curves are basically preferred because of better security, higher efficiency, smaller keys and perfect forward secrecy – however, I used RSA 4096, because adoption is better (its basically available at all servers) and RSA is still unbroken.
Further Information
- OpenSSL Creating a Certificate Authority (CA): https://node-security.com/posts/openssl-creating-a-ca/
- Creating a browser trusted self-signed SSL certificate: https://medium.com/@tbusser/creating-a-browser-trusted-self-signed-ssl-certificate-2709ce43fd15
- Create Your Own SSL Certificate Authority for Local HTTPS Development: https://deliciousbrains.com/ssl-certificate-authority-for-local-https-development/
- How to Be Your Own Certificate Authority: https://www.wikihow.com/Be-Your-Own-Certificate-Authority
- How to Create Trusted Self-Signed SSL Certificates and Local Domains for Testing: https://betterprogramming.pub/trusted-self-signed-certificate-and-local-domains-for-testing-7c6e6e3f9548
- OpenSSL Certificate Authority: https://jamielinux.com/docs/openssl-certificate-authority/introduction.html


Comments are closed