
I this post, I’ll describe how to create a point-to-site VPN connection to Azure. I’ll create the virtual network, the virtual network gateway and configure the point-to-site connection using the Azure portal. I’ll also create a self-signed certificate for the VPN gateway and the Windows 10 client.
Connecting your client via VPN to Azure is by sure useful, if you want to access your Azure resources that are not public available (e.g. virtual machines). Another use case that I had several times was to test the connection of an AppService or Azure function to my on-premise resources. When I was able to access my local client, it also meant that the connection from the app service to the virtual network works and that the basic network configuration of the VPN gateway was okay (without the need to create a virtual machine).
The required steps to connect your client via VPN to Azure are:
- Create Virtual network
- Create VPN gateway
- Configure Point-to-Site VPN
- Create certificate for VPN gateway
- Create certificate for Client
- Connect & Test
Step 1: Create Virtual network
The creation of the virtual network is quite simple. There is just one important thing to consider – it’s the size of the address space and the subnet address range. It’s important that those address spaces are big enough as you will not be able to change it later if there are already resources deployed to it. I wrote a blog post about how to Connect Azure App Service to virtual network. It’s technically the same as it also uses a Point-to-Site connection. The difference is, that we will connect clients and in the mentioned blog post, I connected an app service. The post contains a section about network design which describes it a bit more in detail. The short summary is:
- Virtual network address space must be big enough so that it has at least a default subnet and a gateway subnet. The gateway subnet must have at least /29 (8 addresses), I strongly recommend at least /28 (16 addresses) or even better /27 (32 addresses). You will need them if you want to connect more than one network (VPN, ExpressRoute) and as already mentioned – you can’t change it later. So you must delete the network including the VPN/ExpressRoute connection and recreate all. Instead of deleting it, you could also create another virtual network and peer it with the existing one. But it makes it unnecessarily complicated.
- Client IPs are not part of the virtual network address space. Clients that are connected via Point-to-Site VPN do not have an IP that is part of the virtual network address space. You will configure a separate address space for point-to-site VPN – so consider that in your network configuration (especially Firewall, Router and others)
- Azure reserves 5 private IP addresses from each subnet that cannot be used. The first and the last address of the address space and 3 addresses for internal use (DHCP, DNS).
My configuration will look as follows:
- Virtual network address space: 10.1.0.0/16 (10.1.0.0 – 10.1.255.255)
- Default subnet: 10.1.0.0/24 (10.1.0.0 – 10.1.0.255)
- Gateway subnet: 10.1.1.0/24 (10.1.1.0 – 10.1.1.255)
- Point-to-Site VPN address space: 10.2.0.0/24 (10.2.0.0 – 10.2.0.255)

The address spaces may be a bit oversized, but it doesn’t matter in my case. If you want to limit your whole address space to 256 addresses, have a look at the “Network design” section in this blog post: Connect Azure App Service to virtual network
Step 2: Create virtual network gateway
Virtual network is up and running, so it’s time to create the virtual network gateway (VPN gateway). I’ll use the configuration mentioned above and a basic VPN connection as it’s totally enough for my use case. If you need more power, you can use Standard or even faster connections. The gateway type Route-based is fine for my use case. If you plan to build up a site-to-site connection to your on-premise servers, then the gateway type depends on the requirements of your on-premise VPN device (https://docs.microsoft.com/en-us/azure/vpn-gateway/vpn-gateway-about-vpn-devices.)

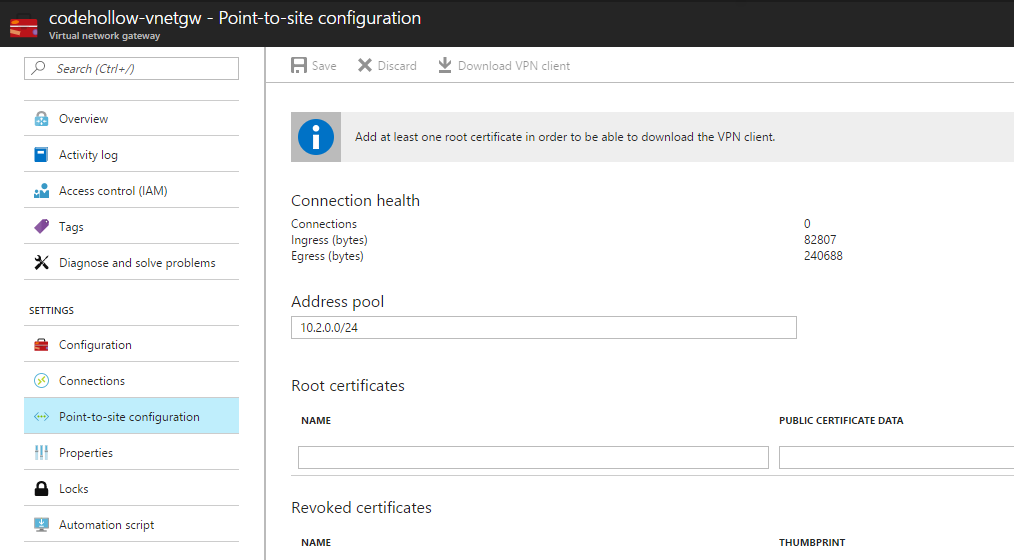
Step 3: Configure Point-to-Site VPN
The virtual network gateway will be used for Site-to-Site VPN connection and for Point-To-Site connections. So let’s navigate to the virtual network gateway and let’s check the Point-to-Site settings. Enter the address pool (in my case 10.2.0.0/24) and save it:
Step 4: Create certificate for VPN
I’ll use a self-signed certificate for the connection, but you can also use your enterprise certificate. The creation of the self-signed certificate can be done in 2 ways:
- makecert.exe: You can use makecert.exe if it’s already installed, but makecert is deprecated. If you have an older version of Powershell (which doesn’t support New-SelfSignedCertificate), then makecert is the right one. If makecert is not yet installed – go for Powershell. A description of how to create the certificate using makecert is here: https://docs.microsoft.com/en-us/azure/vpn-gateway/vpn-gateway-certificates-point-to-site-makecert
- Powershell: Or you use the recommended way which is to create the certificate using Powershell. That’s also what I’ll do in this blog post. A description of how to do it can also be found here: https://docs.microsoft.com/en-us/azure/vpn-gateway/vpn-gateway-certificates-point-to-site
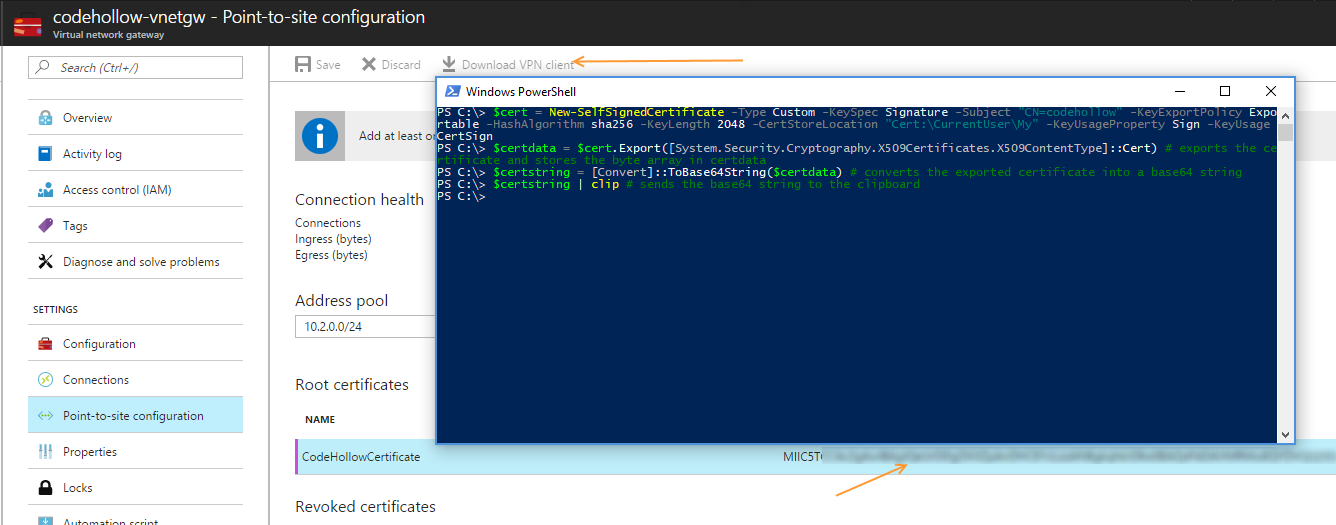
The fastest way to create a self-signed certificate using Powershell – in my opinion – is to use the following script:
$cert = New-SelfSignedCertificate -Type Custom -KeySpec Signature -Subject "CN=codehollow" -KeyExportPolicy Exportable -HashAlgorithm sha256 -KeyLength 2048 -CertStoreLocation "Cert:\CurrentUser\My" -KeyUsageProperty Sign -KeyUsage CertSign
$certdata = $cert.Export([System.Security.Cryptography.X509Certificates.X509ContentType]::Cert) # exports the certificate and stores the byte array in certdata
$certstring = [Convert]::ToBase64String($certdata) # converts the exported certificate into a base64 string
$certstring | clip # sends the base64 string to the clipboard
It creates a self-signed certificate and exports it as string (to the clipboard). Don’t close the Powershell session because we need it later to create the client certificate. Instead go back to the Azure portal and paste the content of the clipboard to the “Public certificate data” field. Give it a useful name and save it.
You can already download the VPN client. If it’s still disabled (grey), just navigate the connections and back to point-to-site configuration (just reload it) and you’ll be able to download and install it.
Step 5: Create the client certificate
Probably you already tried to connect and it failed with the error:
A certificate could not be found that can be used with this Extensible Authentication Protocol. (Error 798).
So let’s create the client certificate at first. Reuse the Powershell session that you used in the previous step and execute:
New-SelfSignedCertificate -Type Custom -KeySpec Signature -Subject "CN=codehollowclient" -KeyExportPolicy Exportable -HashAlgorithm sha256 -KeyLength 2048 -CertStoreLocation "Cert:\CurrentUser\My" -Signer $cert -TextExtension @("2.5.29.37={text}1.3.6.1.5.5.7.3.2")This will create the client certificate. After that, you should be able to connect to your Azure virtual network.
Script to create VPN certificate and client certificate
For quick copy paste – here is the script to create the vpn certificate and one client certificate. After execution, paste the content of the clipboard to the root certificates of the Point-To-Site configuration:
$cert = New-SelfSignedCertificate -Type Custom -KeySpec Signature -Subject "CN=codehollow" -KeyExportPolicy Exportable -HashAlgorithm sha256 -KeyLength 2048 -CertStoreLocation "Cert:\CurrentUser\My" -KeyUsageProperty Sign -KeyUsage CertSign
$certdata = $cert.Export([System.Security.Cryptography.X509Certificates.X509ContentType]::Cert) # exports the certificate and stores the byte array in certdata
$certstring = [Convert]::ToBase64String($certdata) # converts the exported certificate into a base64 string
$certstring | clip # sends the base64 string to the clipboard
New-SelfSignedCertificate -Type Custom -KeySpec Signature -Subject "CN=codehollowclient" -KeyExportPolicy Exportable -HashAlgorithm sha256 -KeyLength 2048 -CertStoreLocation "Cert:\CurrentUser\My" -Signer $cert -TextExtension @("2.5.29.37={text}1.3.6.1.5.5.7.3.2") # creates the client certificate
Step 6: Connect & Test
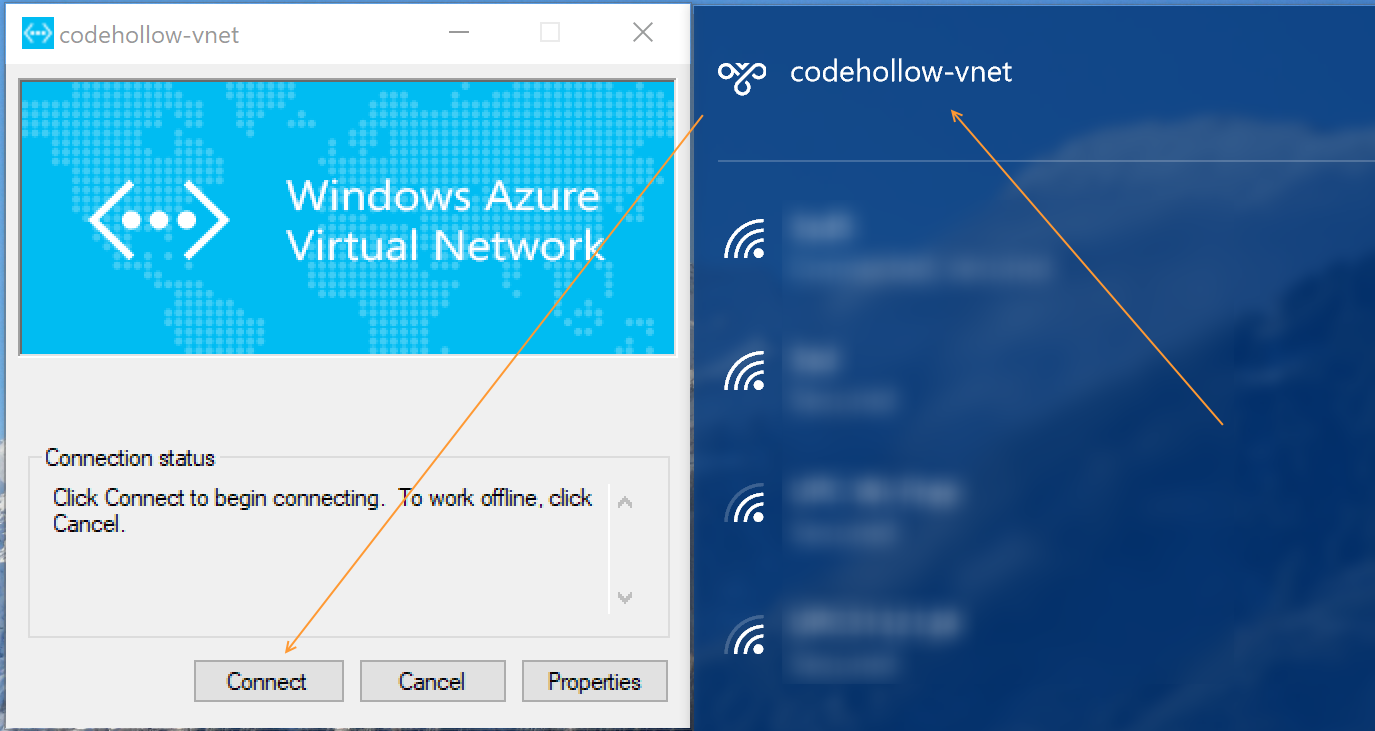
Connect to the VPN and refresh the Point-to-site configuration tab in the Azure portal. You should now see a new Allocated IP address (in my case 10.2.0.1). You should also be able to ping your virtual machines or another service in your virtual network.
Additional information
Connect App Service to virtual network: https://arminreiter.com/2016/12/connect-azure-app-service-to-virtual-network/
Configure a Point-to-Site connection to a VNet using the Azure portal: https://docs.microsoft.com/en-us/azure/vpn-gateway/vpn-gateway-howto-point-to-site-resource-manager-portal


Comments are closed